IT and DevOps
- Using Smart Cards for Remote Git Instances
- OpenZFS Issue #15526 Patch and Mitigation for Older Versions
- Docker and Docker Compose v2 in Fedora CoreOS
- Importing VMs from TrueNAS Core (Bhyve) to Proxmox
- Image Credit - Book Cover Art
- Analyzing SWTPM Logs with Wireshark
Using Smart Cards for Remote Git Instances
Summary
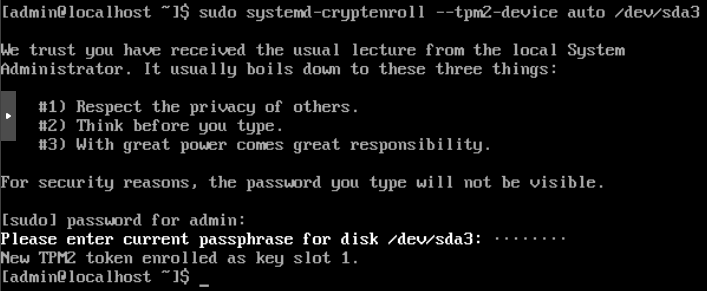
While this feature is undocumented, it is possible to use a smart card to authenticate to a Git repository behind Mutual Transport Layer Security (mTLS). This product describes how to do this given a Gitea instance, a Yubikey PIV smart card and a GNU+Linux information system. The solution is to simply add the following to a user's ~/.gitconfig file:
[http "https://git.example.com"]
        sslCert = "pkcs11:model=PKCS%2315%20emulated;manufacturer=piv_II;serial=0011223344556677;token=someUsername"
        sslKey = "pkcs11:model=PKCS%2315%20emulated;manufacturer=piv_II;serial=0011223344556677;token=someUsername"
        sslbackend = openssl
        sslkeytype = ENG
        sslcerttype = ENG
        sslCertPasswordProtected = true
Additionally, an authentication token must be generated for the user within Gitea (or equivalent). This is how a git pull looks like with this configuration:
$ git pull origin master
Password for 'cert:///pkcs11:model=PKCS%2315%20emulated;manufacturer=piv_II;serial=0011223344556677;token=someUsername':
Username for 'https://git.example.com': someUsername
Password for 'https://someUsername@git.example.com':
From https://git.example.com/someUsername/someRepository
 * branch            master     -> FETCH_HEAD
Already up to date.
Details
Background
Mutual TLS
In TLS, the client authenticates the server by verifying that the certificate has been cryptographically signed by a trusted certificate authority. Most commonly, this is seen when a user browses to a website. A lock icon appears next to their address bar if the server holds a proper certificate and associated private key; otherwise, an error occurs, and with the advent of HSTS, a user may be unable to browse to the website at all.
In mTLS, the server also requests the client to provide a client certificate, proving that it is signed by a certificate authority the server trusts. This is done at the protocol level, disavowing unauthorized users to even see the web app. It bears repeating: even if the server is running vCenter Server 7.0, vulnerable to CVE-2021-21985, an unauthenticated remote code execution (RCE) exploit, the attacker cannot exploit the server unless they have a private key and underlying certificate authorizing them to access vCenter.
Smart Cards
It is possible to simply hold a private key and certificate in an operating system's certificate store, allowing a signed-in user to use the certificate via a simple prompt. It's also possible to require the user to enter the encryption passphrase for the key, though in most environments, the user has the ability to turn this requirement off. Overall, one major issue remains: a password requirement for a private key used for mTLS is a form of single-factor authentication.
Enter NIST's FIPS 201-3, Personal Identify Verification (PIV) of Federal Employees and Contractors. Initially published in 2005, the standard defines a two-factor smart card, allowing an information system to request the user to enter an (up to) eight digit PIN before allowing the use of the private key and certificate. This effective makes PIV devices two-factor authentication security tokens. Yubikeys officially support PIV, and this will be the primary focus of this product.
System Configuration
Prerequisites
Ensure that the gnutls and openssl-pkcs11 packages are installed on your system. The former is used for p11tool, and the latter is used for cURL (the HTTP backend for git). For RHEL-based distros, use the following command to install:
sudo dnf install gnutls openssl-pkcs11 -yCreating .gitconfig
The .gitconfig requires the PKCS11 URI of the certificate and key. To get the URI, use p11tool, like so:
$ p11tool --list-all-certs
warning: no token URL was provided for this operation; the available tokens are:

pkcs11:model=p11-kit-trust;manufacturer=PKCS%2311%20Kit;serial=1;token=System%20Trust
pkcs11:model=p11-kit-trust;manufacturer=PKCS%2311%20Kit;serial=1;token=Default%20Trust
pkcs11:model=PKCS%2315%20emulated;manufacturer=piv_II;serial=0011223344556677;token=someUsername
In this case, the bottom-most line is our PIV device. This can be easily identified by the token value, which for Yubikeys is the subject name.
Create a new file, .gitconfig, in your home directory, containing the following data:
[http "https://git.example.com"]
        sslCert = "pkcs11:model=PKCS%2315%20emulated;manufacturer=piv_II;serial=0011223344556677;token=someUsername"
        sslKey = "pkcs11:model=PKCS%2315%20emulated;manufacturer=piv_II;serial=0011223344556677;token=someUsername"
        sslbackend = openssl
        sslkeytype = ENG
        sslcerttype = ENG
        sslCertPasswordProtected = true
The first line contains the URL for your Gitea (or equivalent) instance. Replace the values for sslCert and sslKey with your URI collected via the p11tool command above.
Gitea Configuration
These steps are specific to Gitea, but similar features are available for popular Git-based source code repository services like Bitbucket, GitLab, or GitHub Enterprise.
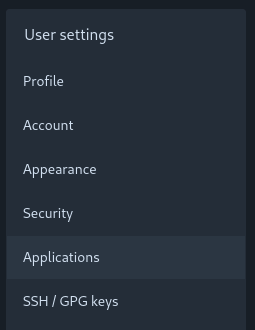
First, login and then press on your profile picture in the top right:

Select "Settings":

Then, select "Applications":
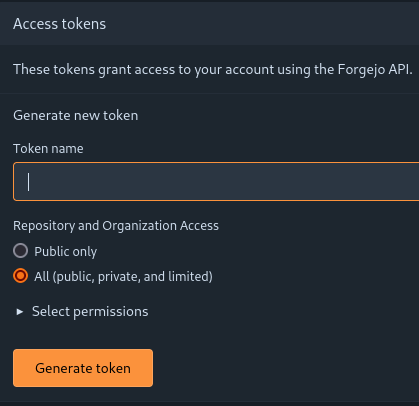
You will be brought to the following screen. Here, you can define a token with granular permissions. This token will be used after the mTLS authentication to the web server. The menu initially looks like so:
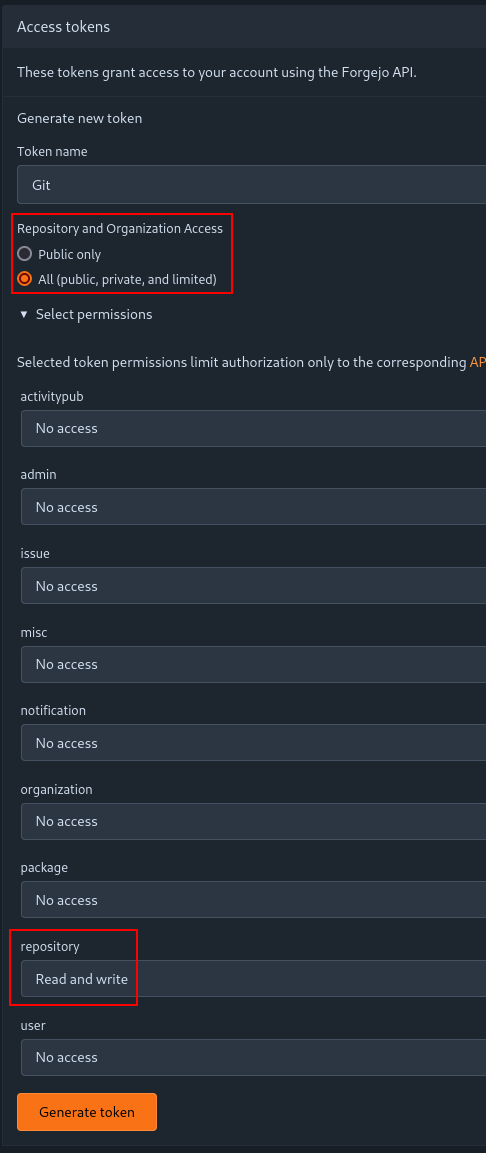
In our case, we set the token to have access to all public, private and limited repositories and organizations; and we allow read and write access to repositories:
Then, press "Generate token". You will be brought to the following screen, where the token secret is display:
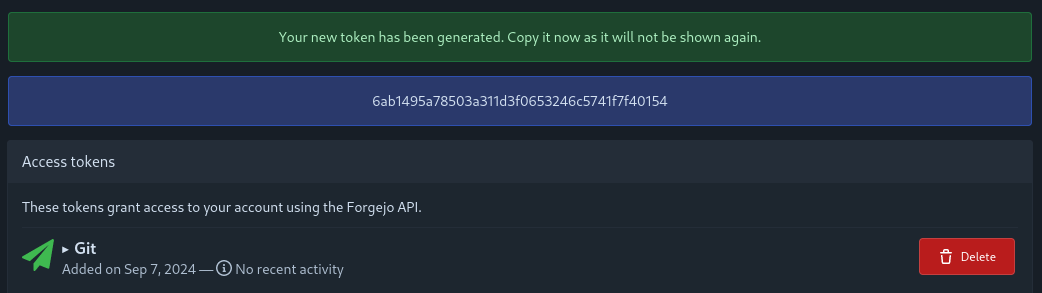
You must save this secret and use it every time you wish to do a Git operation on the remote instance
This is how a git pull looks like with this configuration:
$ git pull origin master
Password for 'cert:///pkcs11:model=PKCS%2315%20emulated;manufacturer=piv_II;serial=0011223344556677;token=someUsername':
Username for 'https://git.example.com': someUsername
Password for 'https://someUsername@git.example.com':
From https://git.example.com/someUsername/someRepository
 * branch            master     -> FETCH_HEAD
Already up to date.
Git will first prompt you for your PIV PIN. Then, it will prompt for the username and the token password.
OpenZFS Issue #15526 Patch and Mitigation for Older Versions
SUBSTANTIAL REVISION: Issue #15526 has been patched in ZFS versions 2.2.2 and 2.1.14, according to open source reporting. The mitigation below only applies to older versions of ZFS.
Summary
A silent data corruption bug exists in ZFS versions 2.1.4 up to 2.1.13, 2.2.0 and 2.2.1, per this GitHub issue. Versions 2.2.2 and 2.1.14 have patched the issue, according to open source reporting.
A ZFS scrub will not identify any data corrupted by this bug. The only high-assurance method to check if any files were corrupted is to compare files within ZFS to their copies stored outside of ZFS.
If you are still using an older version of ZFS that is impacted by this issue, you may significantly lower the chance that this issue impacts your file system by setting the ZFS parameter zfs_dmu_offset_next_sync to 0. Note that this does not prevent the issue from occurring, per this GitHub comment, but it does lower the chance that silent data corruption occurs.
Details
Mitigation
Linux
Runtime
To apply the mitigation in runtime, run the following command as the root user:
echo 0 > /sys/module/zfs/parameters/zfs_dmu_offset_next_syncPermanent
To apply the mitigation permanently, create a file in /etc/modprobe.d/ such as:
/etc/modprobe.d/mitigation.confContaining the following:
options zfs zfs_dmu_offset_next_sync=0FreeBSD
Runtime
To apply the mitigation in runtime, run the following command as the root user:
sysctl -w vfs.zfs.dmu_offset_next_sync=0Permanent
To apply the mitigation permanently, append the following line to /etc/sysctl.conf:
vfs.zfs.dmu_offset_next_sync=0Reproducing the Bug
Linux
To reproduce the bug in Linux, use the script below (copy pasted from the following gist):
#!/bin/bash
#
# Run this script multiple times in parallel inside your pool's mount
# to reproduce https://github.com/openzfs/zfs/issues/15526.  Like:
#
# ./reproducer.sh & ./reproducer.sh & ./reproducer.sh & ./reproducer.sh & wait
#

#if [ $(cat /sys/module/zfs/parameters/zfs_bclone_enabled) != "1" ] ; then
#	echo "please set /sys/module/zfs/parameters/zfs_bclone_enabled = 1"
#	exit
#fi

prefix="reproducer_${BASHPID}_"
dd if=/dev/urandom of=${prefix}0 bs=1M count=1 status=none

echo "writing files"
end=1000
h=0
for i in `seq 1 2 $end` ; do
	let "j=$i+1"
	cp  ${prefix}$h ${prefix}$i
	cp --reflink=never ${prefix}$i ${prefix}$j
	let "h++"
done

echo "checking files"
for i in `seq 1 $end` ; do
	diff ${prefix}0 ${prefix}$i
done
FreeBSD
To reproduce the bug in FreeBSD, use the script below (copy pasted from the following post):
#!/bin/bash
#
# Run this script multiple times in parallel inside your pool's mount
# to reproduce https://github.com/openzfs/zfs/issues/15526.  Like:
#
# ./reproducer.sh & ./reproducer.sh & ./reproducer.sh & ./reproducer.sh & wait
#

#if [ $(cat /sys/module/zfs/parameters/zfs_bclone_enabled) != "1" ] ; then
#       echo "please set /sys/module/zfs/parameters/zfs_bclone_enabled = 1"
#       exit
#fi

prefix="reproducer_${BASHPID}_"
dd if=/dev/urandom of=${prefix}0 bs=1M count=1 status=none

echo "writing files"
end=1000
h=0
for i in `seq 1 2 $end` ; do
        let "j=$i+1"
        cp  ${prefix}$h ${prefix}$i
        cp  ${prefix}$i ${prefix}$j
        let "h++"
done

echo "checking files"
for i in `seq 1 $end` ; do
        diff ${prefix}0 ${prefix}$i
done
Commentary
I was unable to reproduce this issue in TrueNAS Core 13.0-U5.3 (FreeBSD) but I was able to reproduce it in Proxmox 8.0.4 (Debian).
Source Description Block
Multiple sources:
Issue tracking in OpenZFS: https://github.com/openzfs/zfs/issues/15526
Mitigation: https://github.com/openzfs/zfs/issues/15526#issuecomment-1823737998
Linux reproducer script: https://gist.github.com/tonyhutter/d69f305508ae3b7ff6e9263b22031a84
FreeBSD reproducer script: https://www.truenas.com/community/threads/truenas-13-0-u6-is-now-available.114337/page-3
TrueNAS Core (FreeBSD) issue forum thread: https://www.truenas.com/community/threads/silent-corruption-with-openzfs-ongoing-discussion-and-testing.114390/
Documentation on dmu_offset_next_sync: https://openzfs.github.io/openzfs-docs/Performance%20and%20Tuning/Module%20Parameters.html#zfs-dmu-offset-next-sync
Data corruption bug occurs even with zfs_dmu_offset_next_sync set to 0: https://github.com/openzfs/zfs/issues/15526#issuecomment-1826348986
Reddit thread on the bug: https://old.reddit.com/r/DataHoarder/comments/1821mpr/heads_up_for_a_data_corruption_bug_in_zfs_few/
Reddit thread on the bug: https://old.reddit.com/r/zfs/comments/1826lgs/psa_its_not_block_cloning_its_a_data_corruption/
Issue fixed in versions 2.2.2 and 2.1.14: https://www.phoronix.com/news/OpenZFS-2.2.2-Released
Licensing
This page (not including the code snippets) is licensed under a Creative Commons Universal (CC0 1.0) Public Domain Dedication. For code snippet licensing, please contact the original authors.
Docker and Docker Compose v2 in Fedora CoreOS
Summary
If you prefer to use Docker over Podman in Fedora CoreOS, use the Butane file below to add the latest version of Docker and Docker Compose v2 to your system.
Details
Butane
variant: fcos
version: 1.4.0
passwd:
  users:
    - name: core
      ssh_authorized_keys:
        - ssh-[Your SSH key]
storage:
  files:
    - path: /etc/yum.repos.d/docker-ce.repo
      overwrite: true
      contents:
        inline: |
          [docker-ce-stable]
          name=Docker CE Stable - $basearch
          baseurl=https://download.docker.com/linux/fedora/$releasever/$basearch/stable
          enabled=1
          gpgcheck=1
          gpgkey=https://download.docker.com/linux/fedora/gpg
systemd:
  units:
    # Removing unofficial copies of docker and related packages
    - name: rpm-ostree-uninstall.service
      enabled: true
      contents: |
        [Unit]
        Description=Docker rpm-ostree install
        Wants=network-online.target
        After=network-online.target
        # We run before `zincati.service` to avoid conflicting rpm-ostree
        # transactions.
        Before=zincati.service
        ConditionPathExists=!/var/lib/%N.stamp

        [Service]
        Type=oneshot
        RemainAfterExit=yes
        ExecStart=/usr/bin/rpm-ostree override remove docker containerd runc
        ExecStart=/bin/touch /var/lib/%N.stamp

        [Install]
        WantedBy=multi-user.target
    # Installing Docker as a layered package with rpm-ostree
    - name: rpm-ostree-install.service
      enabled: true
      contents: |
        [Unit]
        Description=Docker rpm-ostree install
        Wants=network-online.target
        Requires=rpm-ostree-uninstall.service
        After=rpm-ostree-uninstall.service
        # We run before `zincati.service` to avoid conflicting rpm-ostree
        # transactions.
        Before=zincati.service
        ConditionPathExists=!/var/lib/%N.stamp

        [Service]
        Type=oneshot
        RemainAfterExit=yes
        ExecStart=/usr/bin/rpm-ostree install docker-ce docker-ce-cli containerd.io docker-buildx-plugin docker-compose-plugin
        ExecStart=/bin/touch /var/lib/%N.stamp

        [Install]
        WantedBy=multi-user.target
Butane - Explanation
On line 7, add your SSH public key to be able to sign into your Fedore CoreOS machine. We add the Docker repository as a file. Then, we use some systemd trickery to remove docker, runc and containerd. These are installed by default in Fedora CoreOS, but conflict with the up-to-date versions of Docker, so we remove them. The next service waits for the uninstall service to complete, and installs docker per the Fedora installation guide here.
Your Fedora CoreOS system will reboot in 10 minutes after running these systemd services. It's unfortunately impossible to apply software removals live, so a restart is required. If you wish to restart sooner, you can run systemctl reboot manually.
Why?
Podman doesn't have the equivalent of Docker Compose. Per the suggestion of the Podman development team, we can simply use Docker Compose with a Podman backend. There needs to be some trickery done to support building images with a Podman backend, which can be seen here.
Overall, I found Podman to be more trouble than it's worth. As I worked with Podman for nearly a year, I ran into constant incompatibilities and oddities that had me searching for workarounds for things that should just work. Simply running the latest version of Docker and Docker Compose not only needs my needs, but is stable—I have yet to have any breaking changes due to automatic updates with Docker and Docker Compose v2.
Licensing
This page is licensed under a Creative Commons Universal (CC0 1.0) Public Domain Dedication.
Importing VMs from TrueNAS Core (Bhyve) to Proxmox
Summary
This page explains the process of importing VMs from TrueNAS Core, which uses FreeBSD's Bhyve for virtualization, to Proxmox.
Details
Proxmox
In Proxmox, create a new VM and note its VM number. When creating the VM, follow these guidelines:
In the OS section, select "Do not use any media"

In the System section, select "OVMF (UEFI)" for BIOS. Also select EFI Storage to be the same dataset as where you would like your VM's disk to be. We chose the default local-zfs dataset, but you may choose any other dataset, such as an encrypted dataset if you want your VMs to be encrypted.
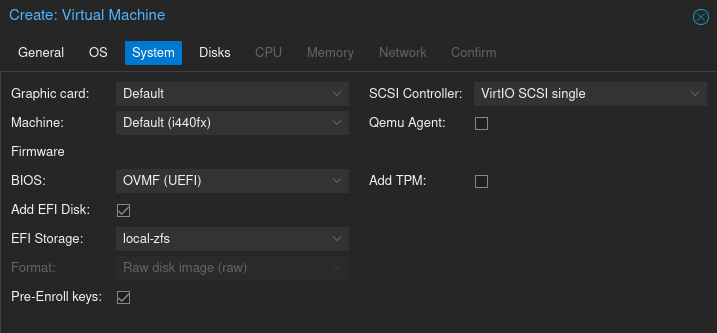
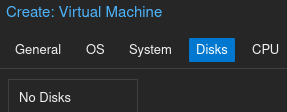
In the disk section, remove the default disk and do not set a disk.
Continue with the rest of the sections per your own personal requirements.
TrueNAS
Shutdown the VM in TrueNAS and make a snapshot of the VM dataset in TrueNAS. Login to SSH in TrueNAS as the root user and run the following command to send the dataset using SSH to Proxmox:
zfs send [VM_Dataset]@[snapshot_name] | ssh root@proxmox 'zfs receive rpool/[any dataset here]/vm-[num]-disk-1'If you use DHCP in your network and you would like your IP address for the VM to be identical after migration, press the devices button in your virtual machine menu:
Then, press the three dots over the "NIC" device and press Edit.

Back to Proxmox
Back in Proxmox, login to the root shell and run the qm rescan command. Then, go into your VM's hardware menu. The disk should show up as an unattached device. You may now attach it.
Congratulations, you have successfully migrated a virtual machine from TrueNAS Core to Proxmox!
Source Description Block
Multiple Sources:
https://forum.proxmox.com/threads/adding-existing-disk-from-storage-to-vm.108645/
https://www.youtube.com/watch?v=yKZ_JJaQHDk
Licensing
This page is licensed under a Creative Commons Universal (CC0 1.0) Public Domain Dedication.
Image Credit - Book Cover Art
Photo by Nadin Sh from Pexels.
The photo represents my feelings about DevOps and related tooling.
Analyzing SWTPM Logs with Wireshark
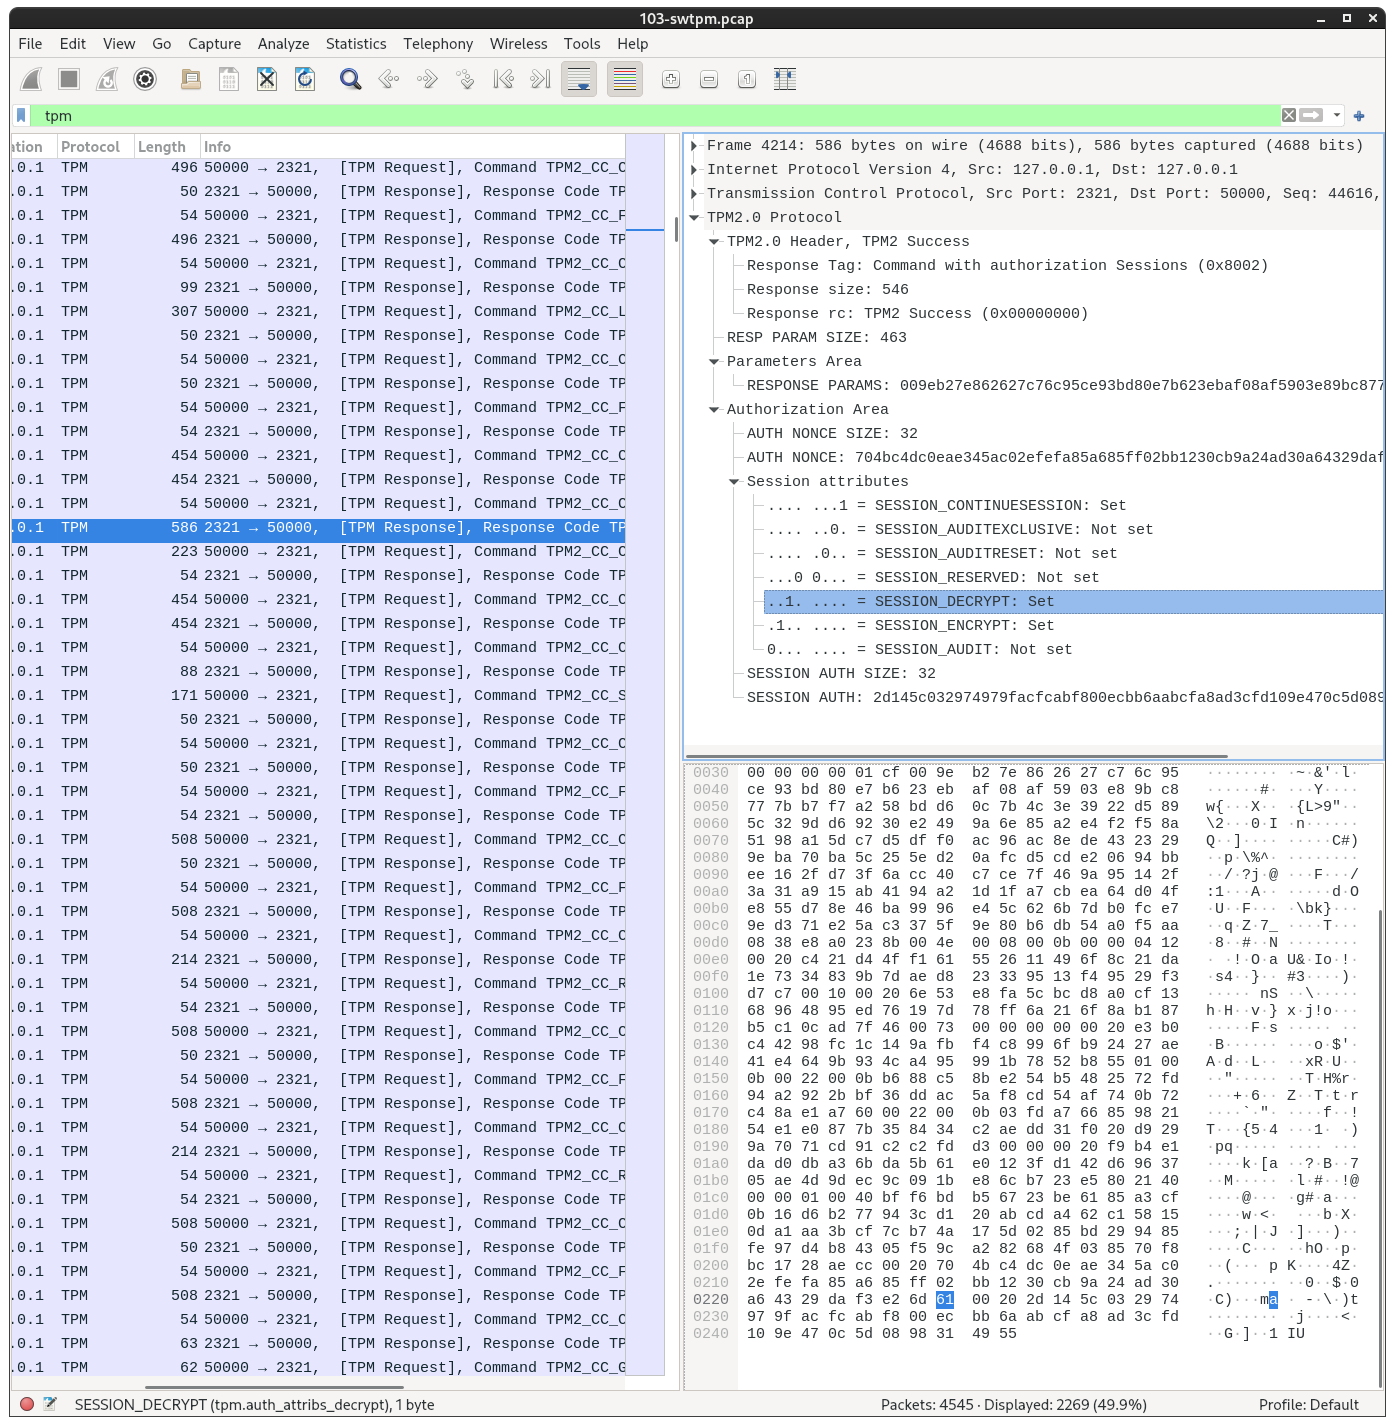
This article aims to bridge the gap for Trusted Platform Module (TPM) log analysis. SWTPM is a software Trusted Platform Module emulator developed by David Safford and Stefan Berger at IBM. SWTPM logs display hexadecimal bytes sent to and from SWTPM, but no human-readable logs are available. Per the author of SWTPM, it's possible to use the ioctl definitions and Trusted Computing Group (TCG) paperwork in order to decode the traffic by hand. WireShark has a high quality TPM traffic decoder, but it doesn't work with the log files from SWTPM unless they've been converted to a PCAP file, first.
When I initially wrote this article, there was no native way to write the logs as a PCAP file. I mentioned this to Stefan Berger, and he was kind enough to implement a PCAP writer in SWTPM natively using the --pcap option. This option is currently available in the master branch; in the meantime, for versions of SWTPM packaged in Linux distributions, including Debian which Proxmox runs on, it's possible to convert the hexadecimal logs a PCAP using the open source swtpm-log-to-pcap script. This article walks through using the script for logs generated by a Proxmox virtual machine with the SWTPM enabled.
Attached in the top left is an SWTPM log and a PCAP generated using the swtpm-log-to-pcap script, if you wish to skip ahead and see the capability for yourself.
Background
Trusted Platform Modules (TPMs) are hardware root of trust devices that are used in cryptographic operations, often in conjunction with full-disk encryption and secure boot. Articles and resources for TPM traffic analysis are quite sparse, making it difficult to test TPM configurations and validate whether the TPM is behaving correctly.
SWTPM is a software implementation of TPMs. You may be familiar with swtpm if you ever used Proxmox's TPM feature, which wholly relies on SWTPM. SWTPM logs simply dump the hexadecimal bytes of traffic to the TPM and from the TPM, but no decoding or other details are available in the official logs. In this GitHub discussion, the author of SWTPM suggests simply referring to ioctl definitions and TCG paperwork in order to decode the traffic by hand.
Thankfully, Wireshark has a packet dissector for the TPM protocol. All you need to do is use swtpm-log-to-pcap, a small script I published on GitHub, to convert the logs to a PCAP. This script was made possible by Philippe Biondi and community's packet manipulation tool Scapy.
Proxmox Walkthrough
Setting Up a Virtual Machine with TPM Support
In Proxmox, create a virtual machine with a TPM 2.0 device. The setting is available in the System tab of the Virtual Machine creation menu:

Modifying Proxmox scripts to enable verbose logging
After creating a virtual machine with a TPM attached, we need to modify a Proxmox script to increase SWTPM verbosity.
Modifying Proxmox scripts is not an officially supported action, so a Proxmox update may revert these changes. If you notice that the changes were reverted after an update, simply repeat the steps below.
Login to Proxmox as the root user and open the /usr/share/perl5/PVE/QemuServer.pm with a text editor like vim:
vim /usr/share/perl5/PVE/QemuServer.pm"file=/run/qemu-server/$vmid-swtpm.log,level=1,prefix=$log_prefix"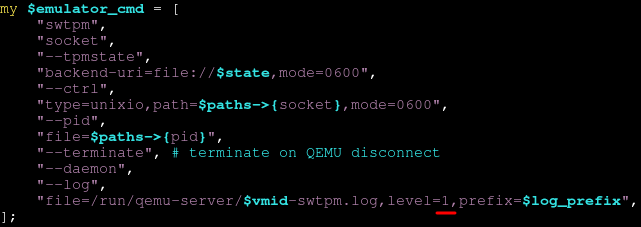
Change the verbosity from 1 to 20, so that the script looks like so:

Per the above script, the SWTPM log will be in /run/qemu-server/$vmid-swtpm.log.
Then, restart the following services for the change to take effect.
Running these commands will cause the web UI to become unresponsive, so doing this over SSH is recommended. If you choose to use the web shell, simply reload the page when it becomes unresponsive after each command.
systemctl restart pveproxy
systemctl restart pvedaemon
In the older Proxmox version 8, the services are instead called pvproxy and pvdaemon, respectively.
Confirm that when launching your VM, your log verbosity is set to 20, by grepping for the virtual machine process:
ps aux | grep swtpm.log,level --color=alwaysYou should see output similar to what's pictured below, confirming that you have log level 20:

Using SWTPM and collecting the logs
Use your VM and the TPM in your virtual machine. For this example, we'll simply install the virtual machine with LUKS full-disk encryption (FDE), and add the TPM as a disk decryption device. This operation will utilize the TPM and generate some very noisy logs to look at!
The above command introduces a privilege escalation vulnerability wherein an adversary with physical access can drop to a root shell while bypassing full disk encryption. This is a simple example and should not be used in a production setup of TPM-based LUKS FDE automatic unlock.
Export the SWTPM logs from Proxmox via scp or a similar mechanism:
scp root@proxmox.home.local:/run/qemu-server/103-swtpm.log .Converting the logs to a PCAP
Install swtpm-log-to-pcap:
git clone https://github.com/henryreed/swtpm-log-to-pcap.git
cd swtpm-log-to-pcap
python3 -m venv venv
source venv/bin/activate
pip install -r requirements.txt
Run the script against your log file:
./swtpm-log-to-pcap.py 103-swtpm.log 103-swtpm.pcapNow, logs like these:
[id=1770793277]  SWTPM_IO_Write: length 546
[id=1770793277]  80 02 00 00 02 22 00 00 00 00 00 00 01 CF 00 9E
[id=1770793277]  B2 7E 86 26 27 C7 6C 95 CE 93 BD 80 E7 B6 23 EB
[id=1770793277]  AF 08 AF 59 03 E8 9B C8 77 7B B7 F7 A2 58 BD D6
[id=1770793277]  0C 7B 4C 3E 39 22 D5 89 5C 32 9D D6 92 30 E2 49
[id=1770793277]  9A 6E 85 A2 E4 F2 F5 8A 51 98 A1 5D C7 D5 DF F0
[id=1770793277]  AC 96 AC 8E DE 43 23 29 9E BA 70 BA 5C 25 5E D2
[id=1770793277]  0A FC D5 CD E2 06 94 BB EE 16 2F D7 3F 6A CC 40
[id=1770793277]  C7 CE 7F 46 9A 95 14 2F 3A 31 A9 15 AB 41 94 A2
[id=1770793277]  1D 1F A7 CB EA 64 D0 4F E8 55 D7 8E 46 BA 99 96
[id=1770793277]  E4 5C 62 6B 7D B0 FC E7 9E D3 71 E2 5A C3 37 5F
[id=1770793277]  9E 80 B6 DB 54 A0 F5 AA 08 38 E8 A0 23 8B 00 4E
[id=1770793277]  00 08 00 0B 00 00 04 12 00 20 C4 21 D4 4F F1 61
[id=1770793277]  55 26 11 49 6F 8C 21 DA 1E 73 34 83 9B 7D AE D8
[id=1770793277]  23 33 95 13 F4 95 29 F3 D7 C7 00 10 00 20 6E 53
[id=1770793277]  E8 FA 5C BC D8 A0 CF 13 68 96 48 95 ED 76 19 7D
[id=1770793277]  78 FF 6A 21 6F 8A B1 87 B5 C1 0C AD 7F 46 00 73
[id=1770793277]  00 00 00 00 00 20 E3 B0 C4 42 98 FC 1C 14 9A FB
[id=1770793277]  F4 C8 99 6F B9 24 27 AE 41 E4 64 9B 93 4C A4 95
[id=1770793277]  99 1B 78 52 B8 55 01 00 0B 00 22 00 0B B6 88 C5
[id=1770793277]  8B E2 54 B5 48 25 72 FD 94 A2 92 2B BF 36 DD AC
[id=1770793277]  5A F8 CD 54 AF 74 0B 72 C4 8A E1 A7 60 00 22 00
[id=1770793277]  0B 03 FD A7 66 85 98 21 54 E1 E0 87 7B 35 84 34
[id=1770793277]  C2 AE DD 31 F0 20 D9 29 9A 70 71 CD 91 C2 C2 FD
[id=1770793277]  D3 00 00 00 20 F9 B4 E1 DA D0 DB A3 6B DA 5B 61
[id=1770793277]  E0 12 3F D1 42 D6 96 37 05 AE 4D 9D EC 9C 09 1B
[id=1770793277]  E8 6C B7 23 E5 80 21 40 00 00 01 00 40 BF F6 BD
[id=1770793277]  B5 67 23 BE 61 85 A3 CF 0B 16 D6 B2 77 94 3C D1
[id=1770793277]  20 AB CD A4 62 C1 58 15 0D A1 AA 3B CF 7C B7 4A
[id=1770793277]  17 5D 02 85 BD 29 94 85 FE 97 D4 B8 43 05 F5 9C
[id=1770793277]  A2 82 68 4F 03 85 70 F8 BC 17 28 AE CC 00 20 70
[id=1770793277]  4B C4 DC 0E AE 34 5A C0 2E FE FA 85 A6 85 FF 02
[id=1770793277]  BB 12 30 CB 9A 24 AD 30 A6 43 29 DA F3 E2 6D 61
[id=1770793277]  00 20 2D 14 5C 03 29 74 97 9F AC FC AB F8 00 EC
[id=1770793277]  BB 6A AB CF A8 AD 3C FD 10 9E 47 0C 5D 08 98 31
[id=1770793277]  49 55
[id=1770793277]  SWTPM_IO_Read: length 14
[id=1770793277]  80 01 00 00 00 0E 00 00 01 62 02 00 00 00
[id=1770793277]  SWTPM_IO_Write: length 414
[id=1770793277]  80 01 00 00 01 9E 00 00 00 00 00 00 00 00 00 00
[id=1770793277]  00 05 02 00 00 00 40 00 00 07 01 82 00 40 65 DE
[id=1770793277]  87 59 4E 80 5A 9B 02 9E A7 5C 1F FF BB 97 DF A4
Will be displayed like this in Wireshark:
Conclusion
By leveraging the open source community's tooling, it's possible to rapidly accelerate system security research efforts by developing and using small scripts like swtpm-log-to-pcap. This script allows embedded developers to verify that their tooling is correctly using SWTPM before production deployment, and information security researchers to identify vulnerabilities by inspecting and decoding the TPM traffic. Special thanks to the developers and community contributors of Proxmox, SWTPM, Scapy, and Wireshark; and thanks to Stefan Berger for implementing this feature natively in SWTPM.